• This community needs YOUR help today!

    With the ever-increasing fees of maintaining our vibrant community (servers, software, domains, email), we need help.
    We need more Supporting Members today.

    Please invest back into this community to help spread our love and knowledge of all aspects of IH Cub Cadet and other garden tractors.

    Why Join?

    • Exclusive Access: Gain entry to private forums.
    • Special Perks: Enjoy enhanced account features that enrich your experience, including the ability to disable ads.
    • Free Gifts: Sign up annually and receive exclusive IH Cub Cadet Tractor Forum decals directly to your door!

    This is your chance to make a difference. Become a Supporting Member today:

    Upgrade Now

International Blade (42") renovation

IH Cub Cadet Forum

Help Support IH Cub Cadet Forum:

This site may earn a commission from merchant affiliate links, including eBay, Amazon, and others.

john.knutson

Well-known member
Joined
Oct 27, 2019
Messages
309
Location
Minneapolis, MN
displayname
John K
I purchased a 42" International Blade yesterday (Craigslist), and am working on getting it first in good working order, and second restored to look something like it originally did.

It is pretty rusty, and missing the lift rod, but I am happy with the price I paid for it, and I didn't have to travel very far.

I have found an supplier of aftermarket lift rods that makes an adjustable rod (25.5" to 30.5") that is under $50, so I am thinking I might order that if shipping is reasonable to hold me over while I look for a reasonably priced OEM part.

Anyway, on to the fun part; pictures :) (some of these were also posted in another thread I created)

bringing it home
IMG_20191030_174041.jpg

"dry fit" - I need to get or make a pin to hold the front of the plow sub frame on the tractor, just using bolts to hold it in place here
IMG_20191031_211654.jpg

FINALLY got it turning left/right. it was very rusted, thank god for PB Blaster
IMG_20191031_213802.jpg

I'm wanting to take this all apart so I can really cleanup the pivoting area where it had rusted solid. More on that below.
IMG_20191031_220144.jpg


Aside from acquiring a lift rod, I want to clean and restore the pivot/swivel area that had rusted solid. I think that means I will need to remove (and later re-attach 😬) the relief springs. Does anybody have advice on how one might safely accomplish that? I could probably pry them off relatively easily, but getting them back on might be challenging.
 

Attachments

  • IMG_20191030_200217.jpg
    IMG_20191030_200217.jpg
    63.5 KB
I think I may have an idea of how to tackle the relief springs! One of the equipment manuals for the plow shows tilting the blade up/back after pulling the bottom pin out while the plow is mounted, which relieves the tension on the springs, hopefully allowing for an easy removal.

After I get the pivot frame and main frame apart and cleaned up, I am thinking I might drill & tap a hole in the pivot frame and attach a grease zerk to the underside to allow pumping that friction point full of grease.

The blade "lock" is in pretty rough shape as well, but PB Blaster, a hammer and chisel, and lots of wiggling have got it partly free. Once the rest of the blade is taken apart I will get a better look at the state of that hardware 🤞.
 
Here's a tip from my forum archives. This was posted by Steve Blunier back in early November 2000, as a way to easily figure out how long the lift rod should be for a blade. I don't have the text from his post but I have the photos so I'll summarize the info: Park the tractor on 2x4 planks or blocks, then with the blade mounted and resting on the floor and the lift handle all the way in the lowered position measure the length between the holes for the lift rod and that should be the optimal length as it will allow the blade to have some travel that is lower than the tractor.

3857.jpg
3858.jpg
 
Your sub-frame appears to have been modified a bit, or is a home made one. It should have wider front brackets with pins so that it latches in place on the QA hooks. Here are some photos I took of mine on one of my parts tractors to illustrate how it should look and mount up.

NF_Blade Sub-Frame_01.jpg
NF_Blade Sub-Frame_02.jpg
NF_Blade Sub-Frame_03.jpg
NF_Blade Sub-Frame_04.jpg
 
Could be a bolt-on subframe for a pre-QA blade.

Subframes always seem to be molested for whatever reason. You can pretty easily build a lift rod for a few bucks if you don't want to buy one. There's not much to them.
 
Here's a tip from my forum archives. This was posted by Steve Blunier back in early November 2000, as a way to easily figure out how long the lift rod should be for a blade. I don't have the text from his post but I have the photos so I'll summarize the info: Park the tractor on 2x4 planks or blocks, then with the blade mounted and resting on the floor and the lift handle all the way in the lowered position measure the length between the holes for the lift rod and that should be the optimal length as it will allow the blade to have some travel that is lower than the tractor.

View attachment 135798View attachment 135799
Thanks! This will be tremendously useful if/when I fab my own lift rod.


Your sub-frame appears to have been modified a bit, or is a home made one. It should have wider front brackets with pins so that it latches in place on the QA hooks.
I was wondering if it was stock or not. I noticed that it hits the mounting studs on the lift mechanism for the mower deck, cutting the lift/travel in half.
 
Could be a bolt-on subframe for a pre-QA blade.

Subframes always seem to be molested for whatever reason. You can pretty easily build a lift rod for a few bucks if you don't want to buy one. There's not much to them.
I can fab up whatever I need pretty easily, glad to have some reassurance that it might not be complete or stock and I'm not just mounting it wrong (which I certainly may be doing).

What do you mean by "pre-QA" blade? My gut says Quality Assurance but perhaps it means something else in the CC world.

EDIT: Nevermind, it means Quick Attach! Duh :)

Thanks for the info!
 
Last edited:
John, the weld point, see arrow in attached photo, on your sub-frame seems to me a tell tale sign that it is homemade as that is where the factory sub-frame has a bend, also some details are a bit crude vs teh factory correct part.

Regarding the pre-QA bolt on sub-frame, that is what is on the Cub Cadet 100 in Steve Blunier's photos that I posted where he was measuring for a lift rod. On his, the mower deck "mule drive" is used as the front mount for the sub-frame.

SUBFRAME-1.jpg
 
'QA' refers to the quick attach feature on the series 4 and up Cubs.
Series four included the 72, 104, 105, 124 & 125 built between Nov '67 starting with serial #218010 and Aug '69 at serial #306085.
 
'QA' refers to the quick attach feature on the series 4 and up Cubs.
Series four included the 72, 104, 105, 124 & 125 built between Nov '67 starting with serial #218010 and Aug '69 at serial #306085.
Thanks for the info! I think I'll post looking for an unmodified QA subframe, but I can make what I have work for now, which is nice.
 
I got the blade apart today, after more hammering and prying.
John, the weld point, see arrow in attached photo, on your sub-frame seems to me a tell tale sign that it is homemade as that is where the factory sub-frame has a bend, also some details are a bit crude vs teh factory correct part.

Regarding the pre-QA bolt on sub-frame, that is what is on the Cub Cadet 100 in Steve Blunier's photos that I posted where he was measuring for a lift rod. On his, the mower deck "mule drive" is used as the front mount for the sub-frame.

View attachment 135809
I think I found a pretty easy way to get the blade mounted via Quick Attach in the front, and given that it is likely not original I am less opposed to modifying it. See 2nd pic below.

Disassembled and hit with a wire wheel. Will do some smoothing with a sanding disc before painting. Trying to source a 1/4" - 28 tap locally for a grease zerk without much luck, so I might just order one online.
IMG_20191101_155928.jpg

The plow is a little rough, there are some small spots where it is rusted through in the top center section above the spring lock. Not sure what I want to do about that, maybe weld some sheet steel behind it?
IMG_20191101_114242.jpg

The front sub frame mount sits right at the back of the QA jaw, so I picked up some 1/2" cold rolled steel (zinc pictured for a test fit, but I don't want to weld zinc). I am thinking I can cut some flat bar, drill 1/2" holes, and weld it up to take advantage of the "Quick Attach" mount. I also have some longer 1/2" zinc rod that I can drill holes and use washers & hitch pins to mount the sub frame.
IMG_20191101_155752.jpg
 
Re-assembled the plow and mounted it last night. Hit the trouble spots with PB Lithium since I couldn't find a 1/4"-28 tap to fit the zerks I have at Home Depot. Good thing I'm getting this together, too, this is what I woke up to this morning:
IMG_20191102_081608.jpg

I did find a 1/4"-28 tap this morning at the local Hardware Hank, I also picked up a U-bolt for the missing lift bracket that I am thinking I will fabricate, and spotted some plow shoes made out of some kind of plastic/composite that caught my eye. I have a paver driveway, and I am thinking those might be a little gentler on any uneven pavers (but it's all pretty flush fortunately).

Didn't get much else done, got a sick kid we are tending too, but I did get a chance to take her for a spin around my yard and driveway. I have a narrow gate between my driveway and backyard, and fortunately it did fit with the plow on. I took some video and a walkaround with my GoPro but the GoPro decided that those videos never happened, which is a first for me. My wife did snap a screenshot from our Nest camera of me "threading the needle":
2019-11-02.png
 
Sick kid is on the mend which means more garage time for me and I made some progress last night.

Picked up a chain wrench to help get the stubborn shoes off. Always thought it was a neat tool, but never needed one.
IMG_20191105_195357.jpg

It worked! The chain didn't want to stay on the narrow edge, but did the trick to crack it free and a big slip tongue and groove pliers (and lots of PB Blaster) helped finish the job. Looking to get some composite shoes for my paver driveway, and will clean these metal ones up in case I want to swap back to original.
IMG_20191106_232201.jpg

Got started on the lift rod too. I need a hotter torch... Thinking of grabbing a MAPP/Oxy setup from the local Home Depot. I'd love a small Oxy Acetylene kit but would rather use that sort of money on tractor parts/accessories (I already have a nice multiprocess Miller welder)
IMG_20191106_220941.jpg
 
Stopped at the Hardware Hank next to my son's doctor's office and picked up some goodies. Opted for a MAPP torch over the MAPP/Oxy because it was what was in stock and about half the price.

The bag of hardware has all the nuts and bolts to try each of the methods of steering wheel removal on the FAQ.

IMG_20191107_124710.jpg
 
Made some progress over the weekend. Just about ready for winter! All that is left now is to figure out how to rig up the lift handle release lock so I can "float" the blade.

Had some 1" x 1/4" bar lying around so I welded 2 bits together and cut a notch for the bar on the bottom, and holes for the U-bolt and lift rod.
IMG_20191108_221031.jpg
IMG_20191108_221036.jpg

Also got a grease zerk added to help keep the left/right rotation free. Probably not necessary, but it was easy enough to do.
IMG_20191110_171330.jpg
IMG_20191110_174150.jpg

I got composite shoes and mounted them as well, but I don't have any pictures of them handy.
 
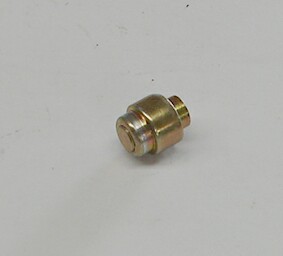
John, nice progress! The lift arm should have a button on the front of where your hand would grip the lift arm. That is a float button. It appears that it may be there in your second photo down in your most recent post. Many of these are missing or worn out. Here's what the button looks like:


IH-401449-R1%20button.jpg


Photo stolen from CC Specialties website. Here's the link to the page with the part. The part is the 10th part down:

CC Specialties Float Button

Thanks! There is a little round housing with a hole where the lock would go, so maybe it is as simple as putting this little button in there. I would like to get the OEM grip and release rod, since mine are missing, but it is functional as is.
 
I believe the rubber grip is NLA. The old button housing will have to come out and the new button goes in. I see you have a bolt as the lift top button.
 
I believe the rubber grip is NLA. The old button housing will have to come out and the new button goes in. I see you have a bolt as the lift top button.
That's what I am afraid if (replacement grip being hard/impossible to source). Worst case I was thinking I might be able to rig some sort of cap to hold the pin in if I find myself wanting to float the blade a lot.
 

Latest posts

Back
Top